

Post-liposuction hardness is one of the most misunderstood aspects of recovery. Patients panic, assume something has gone wrong, and often end up overtreating or undertreating the tissue. Here is exactly what is happening beneath your skin, when it peaks, and the clinical protocol to resolve it.
Looking for a quick answer? Jump to the FAQ below.
The short answer
Hard lumps after liposuction are almost always fibrosis — scar tissue forming in the treated area — not a sign of a failed procedure. Most cases resolve with consistent lymphatic massage and compression between weeks 4 and 12. True complications are rare and come with additional symptoms like fever or worsening pain.
What Causes Post-Lipo Hardness: Fluid vs. Scar Tissue
Two distinct processes create hardness after liposuction, and confusing them leads to the wrong treatment.
Seroma and Edema (Weeks 1–4)
During the first weeks, swelling is largely fluid-driven. The cannula trauma triggers an acute inflammatory response: lymphatic vessels are disrupted, plasma leaks into interstitial tissue, and the body floods the operative zone with healing cytokines. This produces a firm, diffuse swelling that feels uniform and slightly boggy when pressed. This is edema. When lymphatic disruption allows fluid to pool in a defined pocket, that pocket is a seroma. Seromas feel fluctuant, meaning they shift slightly under pressure like a water balloon. Neither edema nor seroma is fibrosis, and neither requires the aggressive massage techniques used for actual scar tissue.
Fibrosis and Scar Tissue (Weeks 4–16+)
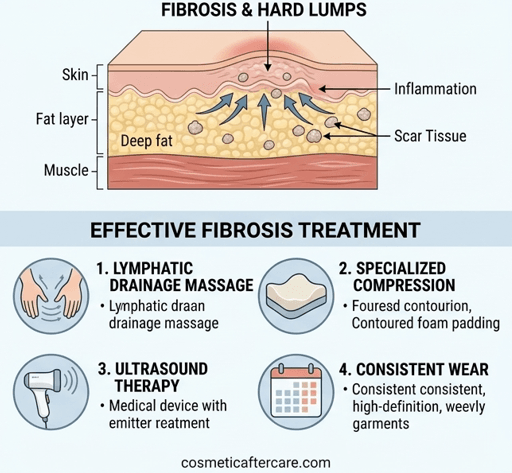
True fibrosis begins when fibroblasts migrate into the traumatized zone and begin depositing collagen. This collagen is laid down in a disorganized, cross-linked pattern that creates dense, irregular nodules and cord-like bands under the skin. Unlike the uniform firmness of edema, fibrosis feels localized: discrete lumps, tight rope-like strands, and patches of skin that are tethered and pull when you move. Fibrosis does not shift under pressure. It does not fluctuate. It is fixed tissue that requires targeted mechanical disruption and enzymatic support to remodel.
Understanding which phase you are in determines everything about how you treat it. Aggressive massage in the first two weeks when you are primarily dealing with edema can worsen inflammation and delay healing. Neglecting massage from weeks four onward when fibrosis sets in allows scar tissue to mature and harden further.
This is normal
- Hard, rope-like areas under the skin in weeks 2–8
- Lumps that shift slightly when pressed
- Firmness that is worse in the morning and softens through the day
- Skin that feels tight or uneven over treated areas
- Temporary increase in firmness after lymphatic massage sessions
Call your surgeon if
- Fever above 38°C / 100.4°F alongside hardness
- Redness and heat concentrated in one area that is getting worse
- Hardness that is still completely unchanged at week 12
- Pain that is increasing rather than gradually improving
- Any open areas or discharge near the lump site
The Timeline: When Lumps Peak and When They Resolve
Understanding the week-by-week progression lets you calibrate your response rather than react to every change in texture.
Days 1–7: Acute Swelling Phase
Maximum edema. The treated area is swollen, bruised, and tender. Hardness at this stage is almost entirely fluid and inflammation-driven. The priority is compression garment compliance, rest, and gentle lymphatic drainage following a structured lymphatic massage schedule if cleared by your surgeon. No deep massage. No foam rolling.
Weeks 2–4: Transition Phase
Bruising resolves. Swelling begins to regionalize. You may notice specific areas that feel harder than others, particularly in zones where fat removal was most aggressive. Fibroblast activity is ramping up but the collagen matrix is still immature and pliable. Manual lymphatic drainage (MLD) by a certified therapist is highly effective during this window. Light self-massage can begin around week two if your surgeon approves.
Weeks 4–8: Fibrosis Peak
This is the critical window. Collagen deposition peaks around weeks four to six post-op. Lumps are at their most prominent, and bands may be clearly palpable. Many patients are alarmed at this stage because results look worse than they did at week two. This is normal. The tissue is actively remodeling. Consistent, targeted massage during this window has the greatest impact on long-term outcome. Missing this window allows collagen to mature into dense, resistant fibrosis that becomes exponentially harder to treat.
Weeks 8–16: Stabilization and Remodeling
Active collagen deposition slows. Lumps that were treated consistently begin to soften. Residual fibrosis from missed treatment windows may persist. At this stage, treatment remains beneficial but requires more intensity, longer duration, and professional ultrasound cavitation or radiofrequency to achieve meaningful breakdown.
Months 4–6: Final Contour
Most treated patients see their final results by month six. Untreated fibrosis can remain palpable for years. The window to resolve lumps non-surgically closes progressively. Act during weeks four to eight.
Step-by-Step Self-Massage Protocol for Post-Lipo Fibrosis
Do not begin this protocol until week two post-op and only with your surgeon’s clearance. Never massage open incision sites or areas with active bruising.
Step 1: Prepare the Tissue (5 Minutes)
Apply a generous layer of a specialized anti-fibrosis gel to the treatment area. Warm the skin with slow, light effleurage strokes using the flat of your palm. Move in the direction of lymphatic flow: upward on the abdomen toward the axilla, upward on the thighs toward the groin. This primes the lymphatic vessels and increases local tissue temperature, making fibrotic collagen more pliable.
Step 2: Locate Fibrotic Zones (2 Minutes)
Use two or three fingertips to systematically palpate the treated area in a grid pattern. You are feeling for discrete nodules (hard, pea-to-marble-sized bumps), rope-like cords running in a linear direction, and tethered patches where the skin feels stuck to the underlying tissue. Note the location and size of each zone. You will be treating these specifically, not massaging the entire area uniformly.
Step 3: Cross-Fiber Friction on Fibrotic Nodules (10–15 Minutes)
Place two fingertips directly on a fibrotic nodule. Apply firm, direct downward pressure until you feel slight resistance from the tissue. Without releasing pressure, move your fingers perpendicular to the direction of the fibrous band. This cross-fiber friction mechanically disrupts the collagen cross-links. Work each nodule for 60 to 90 seconds. The sensation should be a deep, dull pressure. Sharp or shooting pain means too much pressure. Reduce force immediately.
Step 4: Lymphatic Clearance Strokes (5 Minutes)
After working fibrotic zones, clear the disrupted tissue with gentle lymphatic drainage strokes toward the nearest lymph node cluster. For the abdomen, stroke upward and outward toward the armpits. For flanks and outer thighs, stroke upward toward the groin. Keep pressure extremely light during these strokes. The lymphatic capillaries are superficial and only require feather-light contact to activate.
Step 5: Roller Pass (5 Minutes)
Use a textured silicone body roller over the entire treated zone to increase local circulation and further mobilize the tissue. Roll in long upward strokes with moderate pressure. This step is particularly effective for flank and outer thigh fibrosis where finger pressure alone cannot reach the depth of the fascia.
For working on hard lumps at home
A firm massage roller lets you work fibrosis between professional sessions. The Bruizex fibrosis roller is the one we recommend; go gentler than feels productive at first.
Perform this full protocol once daily from weeks two through eight post-op. Twice daily from weeks four through six if fibrosis is pronounced. Each session should total 25 to 30 minutes.
Fibrosis is not a complication. It is the body doing exactly what bodies do after trauma. The question is whether you give it the right conditions to resolve.
Recovery Tools That Accelerate Fibrosis Breakdown
Self-massage alone is effective when fibrosis is mild. For moderate to severe post-lipo lumps, layering in specialized tools dramatically improves outcomes.
Lipo Foam Boards
Flat, dense foam boards worn inside the compression garment — see the guide on Stage 1 vs Stage 2 faja selection to pair the right garment with each healing phase — distribute pressure evenly across the treated zone. Without foam, the garment creates uneven pressure gradients that can actually worsen fibrosis by causing localized high-pressure zones. The foam acts as a pressure equalizer, ensuring consistent compression across the entire operative surface — for exact placement technique, see the full guide on lipo foam placement.
For smoothing compression under the faja
Foam sheets spread the garment’s pressure evenly and protect healing skin. The Bruizex lipo foam 3-pack is the one we recommend.
Ultrasound Cavitation (Professional)
Low-frequency ultrasound cavitation delivered by a trained aesthetician or physical therapist is the most effective non-surgical tool for breaking down established fibrosis. The acoustic pressure waves create micro-vibrations in the fibrotic collagen that mechanically disrupt cross-links and stimulate macrophages to clear the debris. Three to six sessions beginning at week four post-op produce measurable softening in most patients.
Serrapeptase Supplementation
Serrapeptase is a proteolytic enzyme that breaks down non-living fibrous tissue and reduces post-surgical inflammation. Multiple clinical studies support its use in reducing post-operative swelling and fibrosis formation. Standard dosing is 10 mg to 30 mg three times daily on an empty stomach, beginning at week two post-op. Always consult your surgeon before adding any supplement to your recovery protocol.
Anti-Fibrosis Topical Gel
Applied during massage sessions, a purpose-formulated gel improves the mechanical effectiveness of massage by reducing skin friction while simultaneously delivering active ingredients into the tissue. Look for formulations containing arnica montana for bruising and inflammation, bromelain as a natural proteolytic enzyme, and retinol or vitamin C to support collagen remodeling.
When to Contact Your Surgeon
Hardness that develops suddenly after week three alongside warmth and redness requires immediate surgeon evaluation to rule out infection or late seroma formation. Asymmetric lumps that grow rather than shrink after week six need clinical assessment. Fever accompanying localized firmness at any stage is always an emergency. Self-massage and recovery tools work for the expected fibrotic process. They do not replace surgical evaluation when a complication is developing.
Fibrosis is one of the most common reasons patients become concerned that their lipo result is not what they expected. If you are trying to work out whether what you are seeing is part of the normal healing process or something that warrants a surgeon conversation, the guide to evaluating unhappy lipo results walks through how to tell the difference and what to document before your next appointment.
This article is for educational purposes only and is not a substitute for professional medical advice. Always follow your injector’s or surgeon’s specific aftercare instructions.